7.Fragment的使用
注意:不是教程只是笔记,如有错误欢迎批评指正
🍁简介
[Fragment](https://developer.android.google.cn/reference/androidx/fragment/app/Fragment?hl=zh-cn) 表示应用界面中可重复使用的一部分。Fragment 定义和管理自己的布局,具有自己的生命周期,并且可以处理自己的输入事件。Fragment 不能独立存在,而是必须由 Activity 或另一个 Fragment 托管。Fragment 的视图层次结构会成为宿主的视图层次结构的一部分,或附加到宿主的视图层次结构。
怎么理解fragment呢?首先谈谈它的诞生原因,平板电脑的风靡让界面之间的跳转出现了一个问题,不同界面间左侧列表的内容是相同的,需要刷新的仅仅是内容面板,如果每一个列表都重做一个Activity,这种重复的工作,很明显是浪费开发时间和程序资源的。因此Android3.0版本就引入了Fragment,将一个界面模块化(离散化),整个场景使用一个Activity,管理多个Fragment,实现部分区域的内容跳转(刷新),节省资源
很快,随着手机屏幕越做越大,Android4.0版本就把Fragment也运用在了手机端,比如现在的qq,微信的聊天界面的底部菜单就是由一个Activity控制,而各个菜单里的内容由Fragment控制,同时这些Fragment也由这个Activity托管

🌳创建一个Fragment
首先创建一个新的模块,我将其命名为fragment,选择Empty Activity

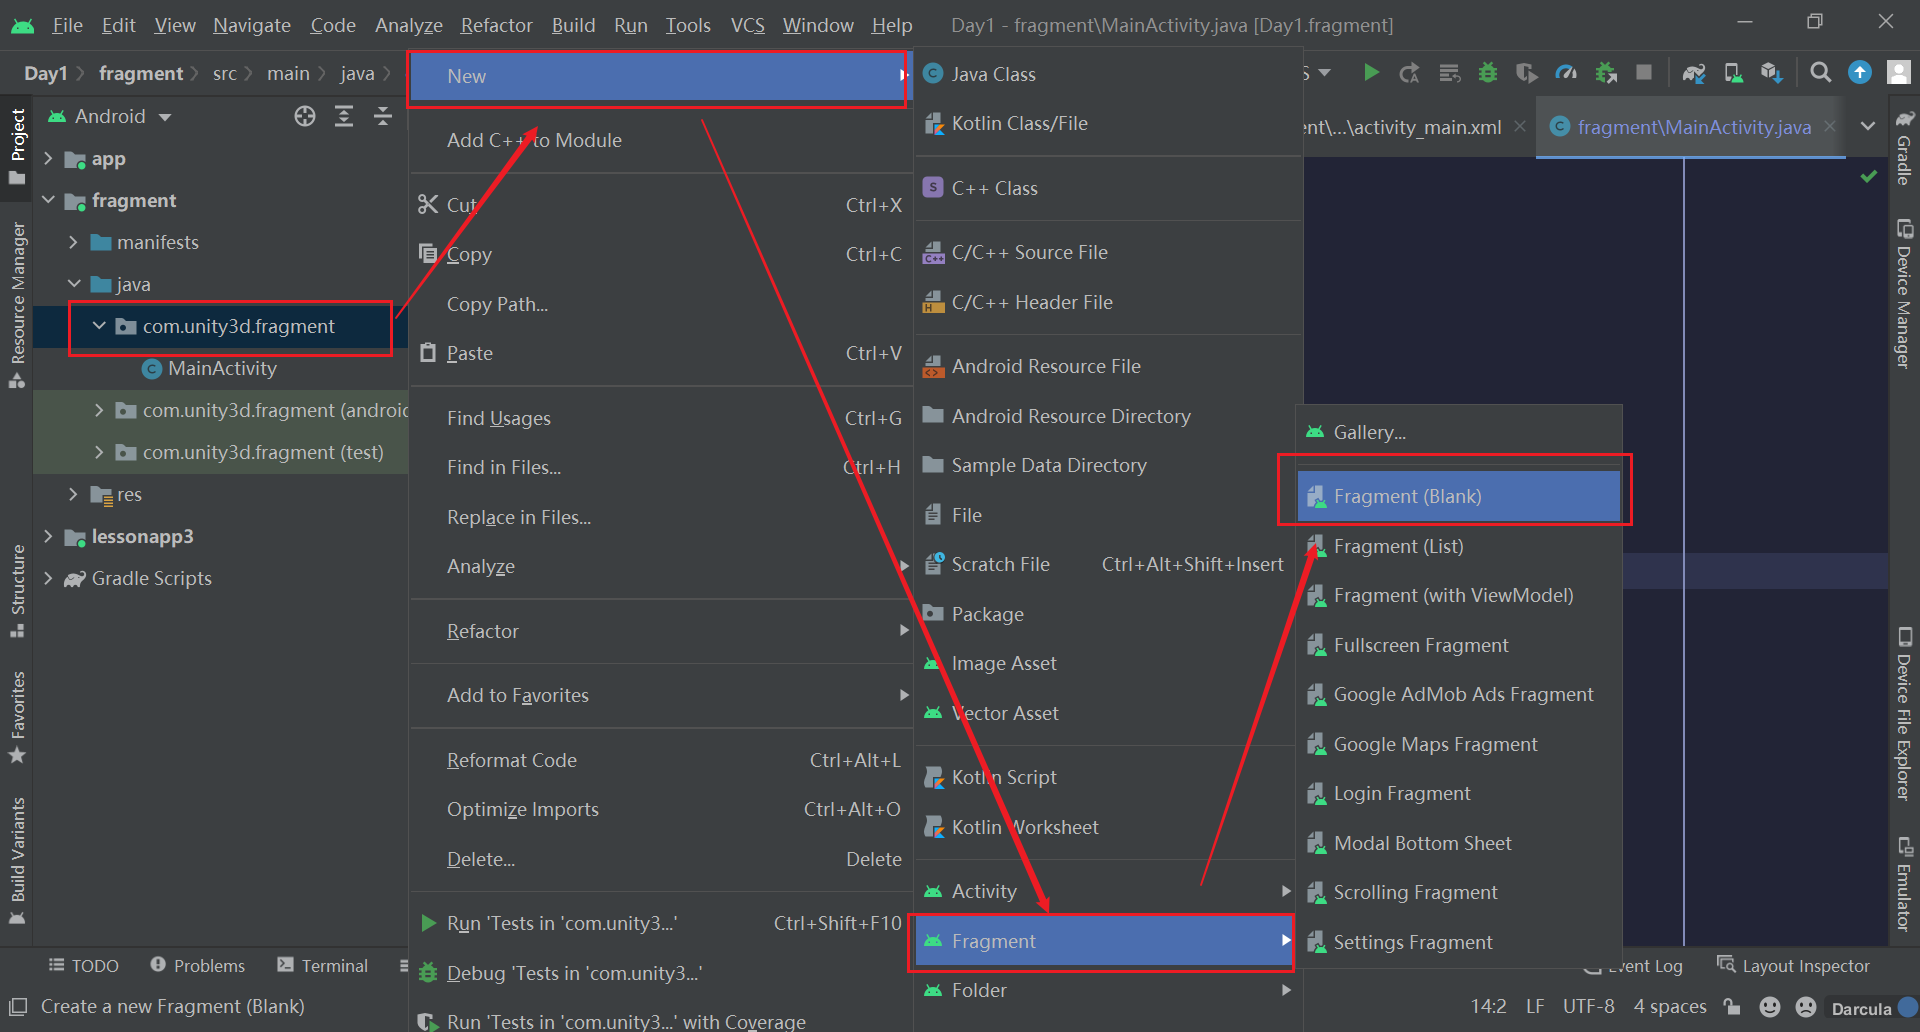
创建一个Fragment的方法与创建一个Activity的方法类似,我将其命名为BlankFragment1

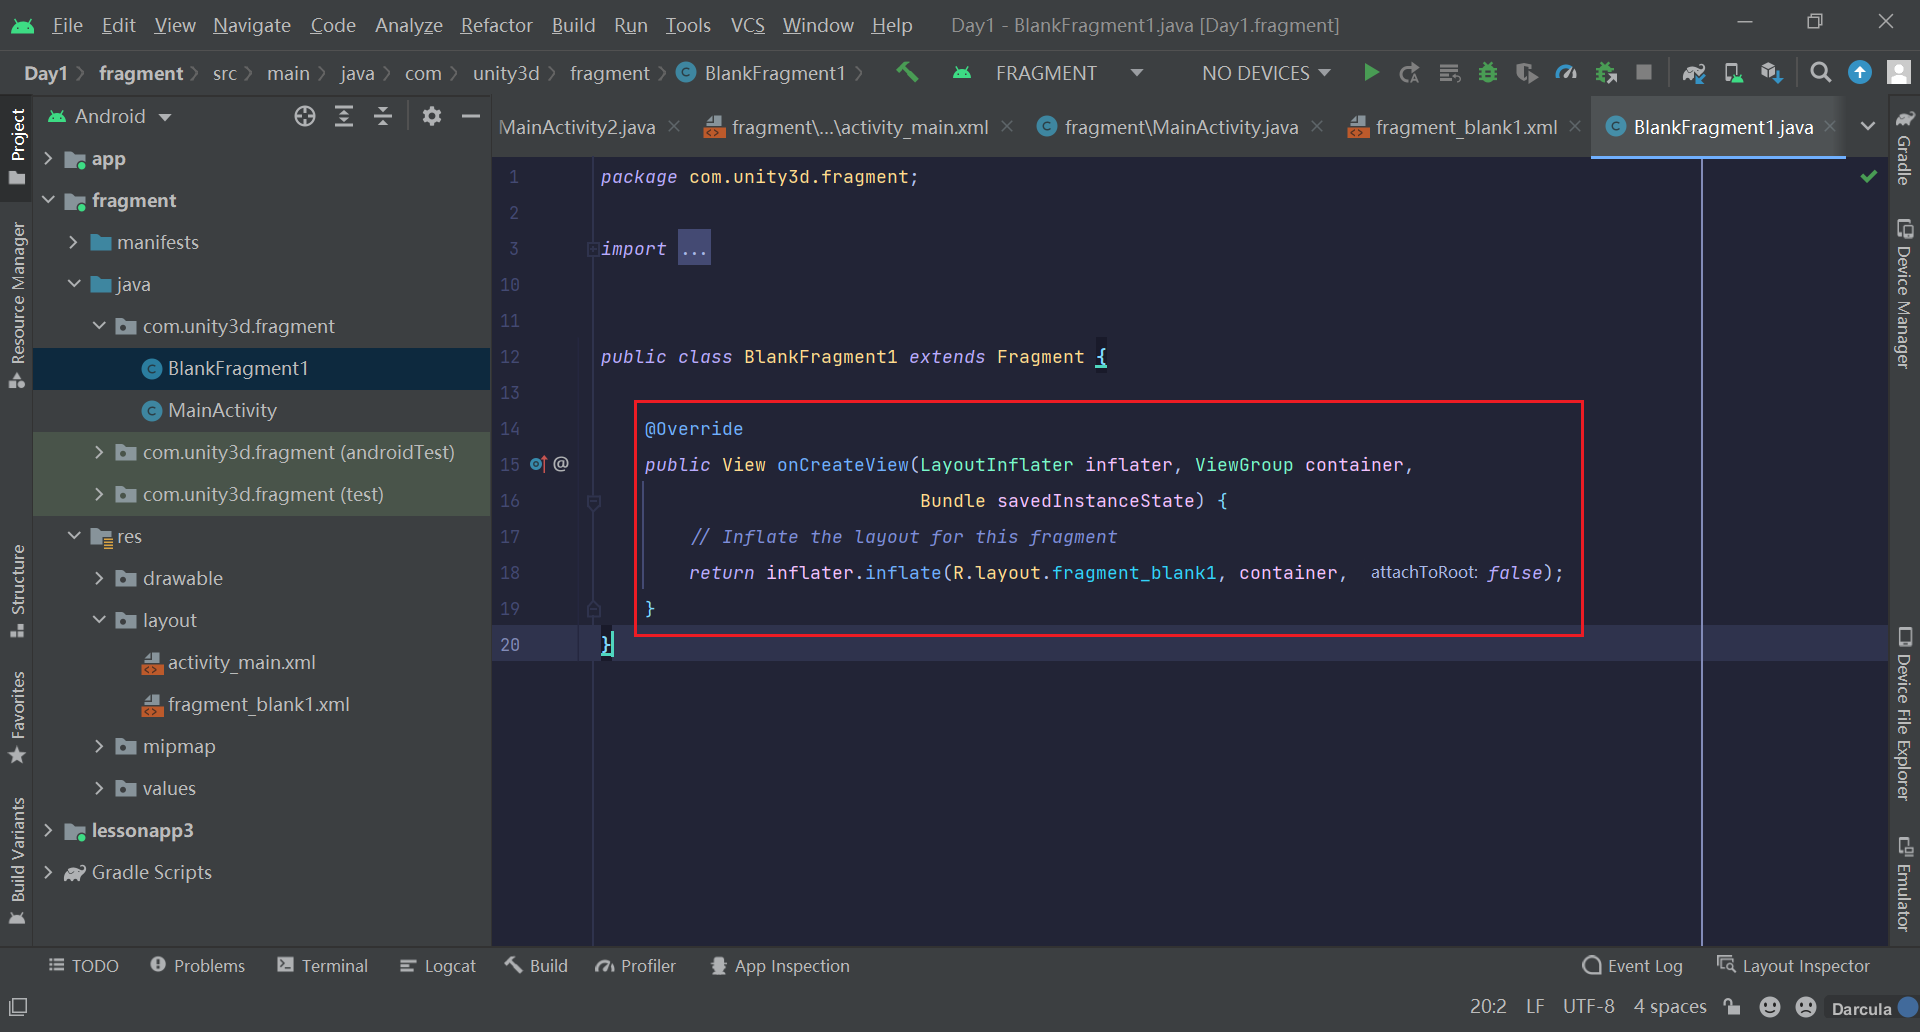
创建好后,我们发现我们多了一个Fragment文件和一个对应的xml文件,所以说Fragment是一个微型Activity是不过分的

自动生成的Fragment文件有很多的方法,这里只用到onCreateView()方法,所以先将其他方法删的干干净净,注释也删掉,这就算成功创建了一个Fragment
@Override
    public View onCreateView(LayoutInflater inflater, ViewGroup container,
                             Bundle savedInstanceState) {
        // Inflate the layout for this fragment
        return inflater.inflate(R.layout.fragment_blank1, container, false);
}!
🌺Fragment的使用(动态添加)
开篇简介提到**Fragment**** 不能独立存在,而是必须由 **Activity** 或另一个 **Fragment** 托管。**可见Fragment必须在Activity中使用,原理很简单,在Activity的布局里再放一个布局来安置Fragment,(当然也可以不放布局直接添加一个Fragment,这属于静态添加Fragment)那么Fragment就成为了Activity的一部分,通过不同的按钮监听将不同的Fragment的布局设置到这个布局中,就实现了动态的添加Fragment啦
那么来理一理思路:
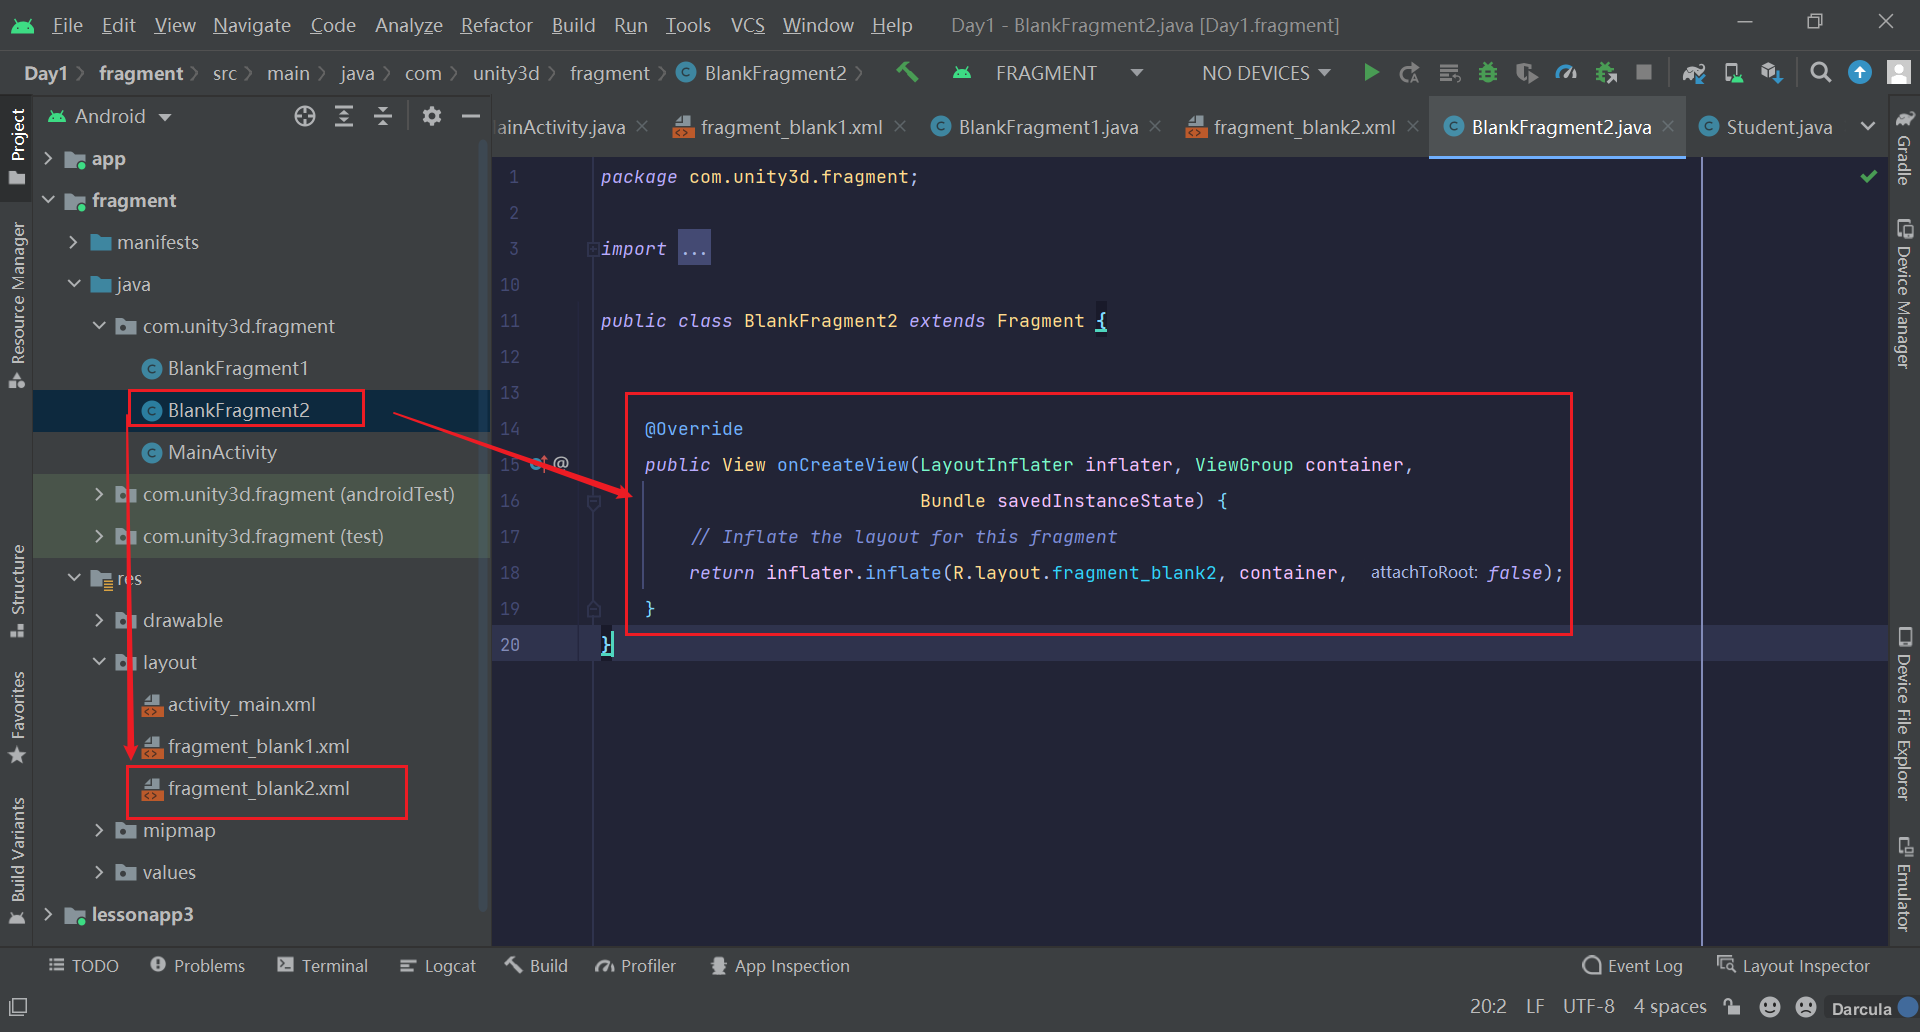
- 首先我们再创建一个
Fragment命名为BlankFragment2 - 在
Activity的布局文件中嵌套的创建一个约束布局,并设置好id,用于放置Fragment - 在
Activity的布局文件中创建两个按钮,用于切换两个Fragment

Activity_main.xml关键代码
<?xml version="1.0" encoding="utf-8"?>
<androidx.constraintlayout.widget.ConstraintLayout xmlns:android="http://schemas.android.com/apk/res/android"
    xmlns:app="http://schemas.android.com/apk/res-auto"
    xmlns:tools="http://schemas.android.com/tools"
    android:layout_width="match_parent"
    android:layout_height="match_parent"
    tools:context=".MainActivity">

    <androidx.constraintlayout.widget.ConstraintLayout
        android:id="@+id/constraintLayout"
        android:layout_width="match_parent"
        android:layout_height="300dp"
        app:layout_constraintLeft_toLeftOf="parent"
        app:layout_constraintTop_toTopOf="parent"></androidx.constraintlayout.widget.ConstraintLayout>

    <Button
        android:id="@+id/button"
        android:layout_width="wrap_content"
        android:layout_height="wrap_content"
        android:layout_marginTop="172dp"
        android:text="Fragment1"
        app:layout_constraintEnd_toStartOf="@+id/button2"
        app:layout_constraintHorizontal_bias="0.5"
        app:layout_constraintStart_toStartOf="parent"
        app:layout_constraintTop_toBottomOf="@+id/constraintLayout" />

    <Button
        android:id="@+id/button2"
        android:layout_width="wrap_content"
        android:layout_height="wrap_content"
        android:text="Fragment2"
        app:layout_constraintEnd_toEndOf="parent"
        app:layout_constraintHorizontal_bias="0.5"
        app:layout_constraintStart_toEndOf="@+id/button"
        app:layout_constraintTop_toTopOf="@+id/button" />


</androidx.constraintlayout.widget.ConstraintLayout>
然后在两个Fragment的布局里写一些东西区分两个Fragment,可以看到Fragment的布局默认是帧布局,不太会用,我改成约束布局

fragment_blank1.xml关键代码
<?xml version="1.0" encoding="utf-8"?>
<androidx.constraintlayout.widget.ConstraintLayout xmlns:android="http://schemas.android.com/apk/res/android"
    xmlns:app="http://schemas.android.com/apk/res-auto"
    xmlns:tools="http://schemas.android.com/tools"
    android:layout_width="match_parent"
    android:layout_height="match_parent"
    tools:context=".BlankFragment1">

    <!-- TODO: Update blank fragment layout -->


    <TextView
        android:id="@+id/textView"
        android:layout_width="wrap_content"
        android:layout_height="wrap_content"
        android:layout_marginTop="204dp"
        android:text="Fragment1"
        android:textSize="30sp"
        android:textColor="@color/black"
        app:layout_constraintEnd_toEndOf="parent"
        app:layout_constraintStart_toStartOf="parent"
        app:layout_constraintTop_toTopOf="parent" />

</androidx.constraintlayout.widget.ConstraintLayout>
fragment_blank2.xml关键代码
<?xml version="1.0" encoding="utf-8"?>
<androidx.constraintlayout.widget.ConstraintLayout xmlns:android="http://schemas.android.com/apk/res/android"
    xmlns:app="http://schemas.android.com/apk/res-auto"
    xmlns:tools="http://schemas.android.com/tools"
    android:layout_width="match_parent"
    android:layout_height="match_parent"
    tools:context=".BlankFragment2">

    <!-- TODO: Update blank fragment layout -->


    <TextView
        android:id="@+id/textView2"
        android:layout_width="wrap_content"
        android:layout_height="wrap_content"
        android:layout_marginTop="251dp"
        android:text="Fragment2"
        android:textColor="@color/black"
        android:textSize="30sp"
        app:layout_constraintEnd_toEndOf="parent"
        app:layout_constraintStart_toStartOf="parent"
        app:layout_constraintTop_toTopOf="parent" />
</androidx.constraintlayout.widget.ConstraintLayout>
🌲在Activity中托管
在Activity中要托管Fragment,就需要获取到这两个对象,并且还要放置到约束布局中
MainActivity关键代码如下
public class MainActivity extends AppCompatActivity {

    BlankFragment1 blankFragment1=new BlankFragment1();
    BlankFragment2 blankFragment2=new BlankFragment2();
    @Override
    protected void onCreate(Bundle savedInstanceState) {
        super.onCreate(savedInstanceState);
        setContentView(R.layout.activity_main);

        findViewById(R.id.button).setOnClickListener(
                (view)->{
                    getSupportFragmentManager().beginTransaction()
                            .replace(R.id.constraintLayout,blankFragment1).commit();
                }
        );
        findViewById(R.id.button2).setOnClickListener(
                (view)->{
                    getSupportFragmentManager().beginTransaction()
                            .replace(R.id.constraintLayout,blankFragment2).commit();
                }
        );
    }
}其中有一行关键的代码
getSupportFragmentManager().beginTransaction()
.replace(R.id.constraintLayout,blankFragment1).commit();replace方法有两个参数,前者是一个布局,后者是一个fragment对象,实现将一个fragment对象放置到布局中显示(实际上是替换,将显示给用户的fragment替换掉)
它做的操作时将已添加的fragment全部都删除掉,然后再加载当前的fragment


🌼添加Fragment(显示与隐藏)
repalce()方法是将已添加的fragment全部都删除掉,然后再加载当前的fragment,频繁的跳转需要不断的删掉之前的fragment,再加载当前的fragment,好像有些麻烦,我们可以一次性将所有fragment都添加进来,然后控制它们的显示也隐藏
MainActivity关键代码
public class MainActivity extends AppCompatActivity {

    BlankFragment1 blankFragment1=new BlankFragment1();
    BlankFragment2 blankFragment2=new BlankFragment2();
    @Override
    protected void onCreate(Bundle savedInstanceState) {
        super.onCreate(savedInstanceState);
        setContentView(R.layout.activity_main);

//        一次性添加
        getSupportFragmentManager().beginTransaction()
                .add(R.id.constraintLayout,blankFragment1)
                .add(R.id.constraintLayout,blankFragment2)
                .commit();

        findViewById(R.id.button).setOnClickListener(
                (view)->{
//                    显示fragment1,隐藏fragment2
                    getSupportFragmentManager().beginTransaction()
                            .hide(blankFragment2)
                            .show(blankFragment1)
                            .commit();
                }
        );
        findViewById(R.id.button2).setOnClickListener(
                (view)->{
//                    显示fragment2,隐藏fragment1
                    getSupportFragmentManager().beginTransaction()
                            .hide(blankFragment1)
                            .show(blankFragment2)
                            .commit();
                }
        );
    }
}老师特意介绍了这种方法,感觉有点麻烦,而且一起添加所有的fragment,数量多了应该也会影响性能,可能老师的本意是想告诉我们对于用户频繁所有的几个fragment可以提前add,然后只需控制显示隐藏,就不要重复加载了
🥀Fragment 定义和管理自己的布局
Fragment 定义和管理自己的布局,具有自己的生命周期,并且可以处理自己的输入事件
定义和管理自己的布局这个好说前面已经展示了,Activity的布局怎么用,Fragment的布局就怎么用
那么Fragment 如何获取组件,处理输入事件呢?也是findViewById()吗?
方法一:onCreateView()
onCreateView()方法的返回值是一个View对象,所以我们也是通过这个view对象取获取到fragment的组件并设置其值
public class BlankFragment1 extends Fragment {

    @Override
    public View onCreateView(LayoutInflater inflater, ViewGroup container,
                             Bundle savedInstanceState) {
        // Inflate the layout for this fragment
        View view=inflater.inflate(R.layout.fragment_blank1, container, false);
        TextView textView=view.findViewById(R.id.textView);
        textView.setText("湖南中医药大学!");
        textView.setTextColor(getResources().getColor(R.color.purple_200));
        return view;
    }
}点击按钮Fragment1,可以看到跳转出的界面上的文字已经是刚刚新设置的值了

方法二:重写onActivityCreated()
方法二需要重写onActivityCreated(),这里我实现监听文本组件,用户点击文本组件就可以更新上面的内容
public class BlankFragment1 extends Fragment {

    @Override
    public View onCreateView(LayoutInflater inflater, ViewGroup container,
                             Bundle savedInstanceState) {
        // 方法一
        View view=inflater.inflate(R.layout.fragment_blank1, container, false);
//        TextView textView=view.findViewById(R.id.textView);
//        textView.setText("湖南中医药大学!");
//        textView.setTextColor(getResources().getColor(R.color.purple_200));
        return view;
    }

    @Override
//    方法二
    public void onActivityCreated(@Nullable Bundle savedInstanceState) {
        super.onActivityCreated(savedInstanceState);
        TextView textView=getActivity().findViewById(R.id.textView);
        textView.setOnClickListener(new View.OnClickListener() {
            @Override
            public void onClick(View view) {
                textView.setText("方法二设置文本内容");
            }
        });

    }
}
🌷Fragment与Activity的组件获取
刚刚讲的都是Fragment怎么获取自己的布局的组件,那么我想通过
Fragment获取到Activity的组件并实现监听,或者Activity获取到Fragment的组件实现监听又该如何实现呢?
Fragment获取到Activity的组件并实现监听
这个其实就是重写onActivityCreated()方法,使用getActivity().findViewById(R.id.button);
public class BlankFragment1 extends Fragment {

    @Override
    public View onCreateView(LayoutInflater inflater, ViewGroup container,
                             Bundle savedInstanceState) {
        // 方法一
        View view=inflater.inflate(R.layout.fragment_blank1, container, false);
//        TextView textView=view.findViewById(R.id.textView);
//        textView.setText("湖南中医药大学!");
//        textView.setTextColor(getResources().getColor(R.color.purple_200));
        return view;
    }

    @Override
//  Fragment获取到Activity的组件并实现监听
    public void onActivityCreated(@Nullable Bundle savedInstanceState) {
        super.onActivityCreated(savedInstanceState);
        Button button=getActivity().findViewById(R.id.button);
        button.setOnClickListener(new View.OnClickListener() {
            @Override
            public void onClick(View view) {
                button.setText("成功获取Activity组件");
            }
        });

    }
}