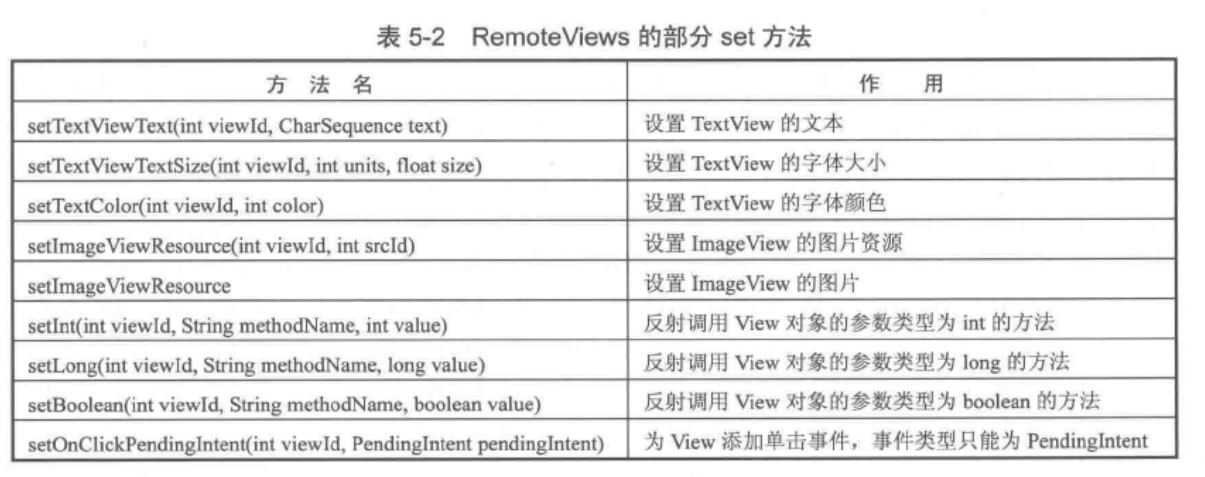
可以在其他进程中显示,可以跨进程更新界面。 使用场景:通知栏和桌面小部件
RemoteViews的应用
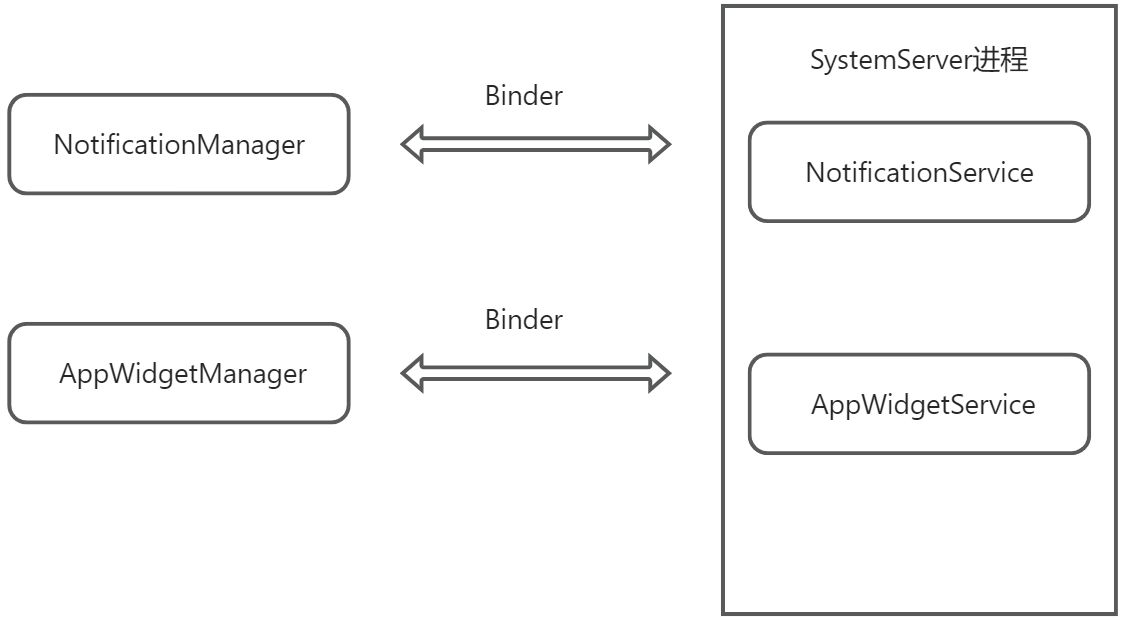
通知栏:NotificationManager的notify方法来实现。 桌面小部件:AppWidgetProvider实现(本质是一个广播) 二者均运行在系统的SystemServer进程中。
通知栏
RemoteViews指定应用包名和布局id加载自定义通知栏样式。 如何更新View:
- 更新文本:remoteViews.setTextViewText(文本控件id,更新值)
- 更新图片:remoteViews.setImageViewResource(图片控件id,图片资源)
- 添加响应:remoteViews.setOnClickPendingIntent(添加响应的控件id,PendingIntent)
什么时PendingIntent:待定的Intent,必须由用户触发。
- NotificationManager通知管理类 ,它是一个系统服务。调用 NotificationManager 的 notify() 方法可以向系统发送通知。
- Notification : 通知对应类,保存通知相关的数据。NotificationManager 向系统发送通知时会用到。
- Notification.Builer 、NotificationCompat.Builer: 使用建造者模式构建 Notification 对象。
Notification.Builer 与 NotificationCompat.Builer 的区别:
@Deprecated
public Builder(@NonNull Context context) {
    this(context, (String) null);
}
//已经被  替代 而channelId的实际作用是将notification进行分类,如设置不同优先级等。
public Builder(@NonNull Context context, @NonNull String channelId) {
    mContext = context;
    mChannelId = channelId;
    // Set defaults to match the defaults of a Notification
    mNotification.when = System.currentTimeMillis();
    mNotification.audioStreamType = Notification.STREAM_DEFAULT;
    mPriority = PRIORITY_DEFAULT;
    mPeople = new ArrayList<>();
    mAllowSystemGeneratedContextualActions = true;
}Android Notification 史上最全面的解析NotificationCompat.Builder()过时,失效_寻找你的海洋的博客-CSDN博客_notificationcompat.builder没有
NotificationManager
NotificationManager是一个Android系统服务,用于管理和运行所有通知。 NotificationManager因为是系统服务,所以不能被实例化,为了把Notification传给它,可以用getSystemService()方法获取一个NotificationManager的引用。 getSystemService()方法接收一个字符串参数用于确定获取系统那一个服务,这里是Context.NOTIFICATION_SERVICE。
NotificationManager manager= (NotificationManager)
getSystemService(Context.NOTIFICATION_SERVICE);通知式样介绍

- ① 小图标:此为必要图标,通过 setSmallIcon() 设置。
- ② 应用名称:此由系统提供。
- ③ 时间戳:此由系统提供,不过您可以通过 setWhen() 进行替换,或使用 setShowWhen(false) 将其隐藏。
- ④ 大图标:此为可选图标(通常仅用于联系人照片;请勿将其用于应用图标),通过 setLargeIcon() 设置。
- ⑤ 标题:此为可选内容,通过 setContentTitle() 设置。
- ⑥ 文本:此为可选内容,通过 setContentText() 设置。
创建Notification对象
NotificationManager manager= (NotificationManager) getSystemService(Context.NOTIFICATION_SERVICE);
    Intent intent=new Intent(this,MainActivity.class);
    intent.setFlags(Intent.FLAG_ACTIVITY_NEW_TASK | Intent.FLAG_ACTIVITY_CLEAR_TASK);
    PendingIntent pendingIntent=PendingIntent.getActivity(this,0,intent,PendingIntent.FLAG_IMMUTABLE);

    String channelId = createNotificationChannel("my_channel_ID", "my_channel_NAME", NotificationManager.IMPORTANCE_HIGH);
    NotificationCompat.Builder notification=new NotificationCompat.Builder(NotificationActivity.this,channelId)
            .setContentText("你好世界")
            .setContentTitle("chapter5_1")
            .setContentIntent(pendingIntent)
            .setSmallIcon(R.mipmap.ic_launcher)
            .setAutoCancel(true)
            .setWhen(System.currentTimeMillis());

manager.notify(1,notification.build());通过RemoteViews自定义控件
NotificationManager manager= (NotificationManager) getSystemService(Context.NOTIFICATION_SERVICE);
    Intent intent=new Intent(this,MainActivity.class);
    intent.setFlags(Intent.FLAG_ACTIVITY_NEW_TASK | Intent.FLAG_ACTIVITY_CLEAR_TASK);
    PendingIntent pendingIntent=PendingIntent.getActivity(this,0,intent,PendingIntent.FLAG_IMMUTABLE);

    String channelId = createNotificationChannel("my_channel_ID", "my_channel_NAME", NotificationManager.IMPORTANCE_HIGH);

    RemoteViews remoteViews=new RemoteViews(getPackageName(),R.layout.layout_notification);
    remoteViews.setTextViewText(R.id.msg,"remoteViews");
    remoteViews.setImageViewResource(R.id.icon,R.drawable.ic_launcher_background);

    NotificationCompat.Builder notification=new NotificationCompat.Builder(NotificationActivity.this,channelId)
            .setContentText("你好世界")
            .setContentTitle("chapter5_1")
            .setContentIntent(pendingIntent)
            .setSmallIcon(R.mipmap.ic_launcher)
            .setAutoCancel(true)
            .setCustomContentView(remoteViews)//设置RemoteViews
            .setWhen(System.currentTimeMillis());

manager.notify(2,notification.build());如何更新View:
- 更新文本:remoteViews.setTextViewText(文本控件id,更新值)
- 更新图片:remoteViews.setImageViewResource(图片控件id,图片资源)
- 添加响应:remoteViews.setOnClickPendingIntent(添加响应的控件id,PendingIntent)
桌面小部件
AppWidgetProvider类,本质是一个广播,即BroadcastRecevier。  构建应用微件 | Android 开发者 | Android Developers
1.定义AppWidgetProviderInfo 元数据(小部件配置信息)
保存在项目的 res/xml/ 文件夹中。 AppWidgetProviderInfo 定义应用微件的基本特性,如应用微件的最小布局尺寸、应用微件的初始布局资源、应用微件的更新频率,以及(可选)在应用微件创建时启动的配置 Activity。
<appwidget-provider xmlns:android="http://schemas.android.com/apk/res/android"
    android:minWidth="40dp"
    android:minHeight="40dp"
    android:updatePeriodMillis="86400000"
    android:previewImage="@drawable/ic_adb"
    android:initialLayout="@layout/example_appwidget"
    android:resizeMode="horizontal|vertical"
    android:widgetCategory="home_screen">
</appwidget-provider>2.创建小组件布局
保存在项目的 res/layout/ 目录中
INFO
RemoteViews 对象(因而应用微件)可以支持以下布局类:
以及以下微件类:
- AnalogClock
- Button
- Chronometer
- ImageButton
- ImageView
- ProgressBar
- TextView
- ViewFlipper
- ListView
- GridView
- StackView
- AdapterViewFlipper
不支持这些类的后代。
<LinearLayout xmlns:android="http://schemas.android.com/apk/res/android"
    android:layout_width="match_parent"
    android:layout_height="match_parent"
    android:orientation="vertical">

    <ImageView
        android:id="@+id/image"
        android:layout_width="wrap_content"
        android:layout_height="wrap_content"
        android:src="@drawable/ic_adb">
    </ImageView>
</LinearLayout>3.定义 AppWidgetProvider 实现类
AppWidgetProvider 类扩展了 BroadcastReceiver 作为一个辅助类来处理应用微件广播。AppWidgetProvider 仅接收与应用微件有关的事件广播,例如当更新、删除、启用和停用应用微件时发出的广播。当发生这些广播事件时,AppWidgetProvider 会接收以下方法调用:
onUpdate()
调用此方法可以按 AppWidgetProviderInfo 中的 updatePeriodMillis 属性定义的时间间隔来更新应用微件(请参阅上文的添加 AppWidgetProviderInfo 元数据)。当用户添加应用微件时也会调用此方法,所以它应执行基本设置,如定义视图的事件处理脚本以及根据需要启动临时的 Service。
onAppWidgetOptionsChanged()
当首次放置微件时以及每当调整微件的大小时,会调用此方法。您可以使用此回调来根据微件的大小范围显示或隐藏内容。您可以通过调用 getAppWidgetOptions() 来获取大小范围,该方法会返回包含以下各项的 Bundle:
- OPTION_APPWIDGET_MIN_WIDTH - 包含微件实例的当前宽度的下限(以 dp 为单位)。
- OPTION_APPWIDGET_MIN_HEIGHT - 包含微件实例的当前高度的下限(以 dp 为单位)。
- OPTION_APPWIDGET_MAX_WIDTH - 包含微件实例的当前宽度的上限(以 dp 为单位)。
- OPTION_APPWIDGET_MAX_HEIGHT - 包含微件实例的当前高度的上限(以 dp 为单位)。
此回调是在 API 级别 16 (Android 4.1) 中引入的。如果您实现此回调,请确保您的应用不依赖于它,因为在旧款设备上不会调用它。
onDeleted(Context, int[])
每次从应用微件托管应用中删除应用微件时,都会调用此方法。
onEnabled(Context)
首次创建应用微件的实例时,会调用此方法。例如,如果用户添加应用微件的两个实例,只有首次添加时会调用此方法。如果您需要打开一个新的数据库或执行只需要对所有应用微件实例执行一次的其他设置,则此方法非常合适。
onDisabled(Context)
从应用微件托管应用中删除了应用微件的最后一个实例时,会调用此方法。您应使用此方法来清理在 onEnabled(Context) 中完成的所有工作,如删除临时数据库。
onReceive(Context, Intent)
针对每个广播调用此方法,并且是在上述各个回调方法之前调用。您通常不需要实现此方法,因为默认的 AppWidgetProvider 实现会过滤所有应用微件广播并视情况调用上述方法。 最重要的 AppWidgetProvider 回调是 onUpdate(),因为向托管应用添加每个应用微件时都会调用它 如果应用微件接受任何用户交互事件,则您需要在此回调中注册事件处理脚本。如果应用微件未创建临时文件或数据库,或者未执行其他需要清理的工作,则 onUpdate() 可能是您需要定义的唯一一个回调方法。例如,如果您希望应用微件具有一个在用户点击时会启动 Activity 的按钮
/**
     * 每次窗口小部件被点击更新都调用一次该方法
     */
    @Override
    public void onUpdate(Context context, AppWidgetManager appWidgetManager,
            int[] appWidgetIds) {
        super.onUpdate(context, appWidgetManager, appWidgetIds);
        Log.i(TAG, "onUpdate");

        final int counter = appWidgetIds.length;
        Log.i(TAG, "counter = " + counter);
        for (int i = 0; i < counter; i++) {
            int appWidgetId = appWidgetIds[i];
            Intent intent=new Intent(context,MainActivity.class);
            PendingIntent pendingIntent=PendingIntent.getActivity(context,0,intent,0);
            RemoteViews views=new RemoteViews(context.getPackageName(),R.layout.example_appwidget);
            views.setOnClickPendingIntent(R.id.imageView,pendingIntent);
            appWidgetManager.updateAppWidget(appWidgetId,views);
        }

}4.在AndroidManifest.xml中声明小组件
<receiver android:name=".MyAppWidgetProvider"
    android:exported="true">
    <meta-data
        android:name="android.appwidget.provider"
        android:resource="@xml/appwidget_provider_info">//这个是组件的配置文件
    </meta-data>

    <intent-filter>
        <action android:name="com.hnucm.chapter5_1.action.CLICK"/>//用于识别小组件的单击行为
        <action android:name="android.appwidget.action.APPWIDGET_UPDATE" />//固定写法,小组件的标识
    </intent-filter>
</receiver>AppWidgetProvider源码分析
public void onReceive(Context context, Intent intent) {
        // Protect against rogue update broadcasts (not really a security issue,
        // just filter bad broacasts out so subclasses are less likely to crash).
        String action = intent.getAction();
        if (AppWidgetManager.ACTION_APPWIDGET_UPDATE.equals(action)) {
            Bundle extras = intent.getExtras();
            if (extras != null) {
                int[] appWidgetIds = extras.getIntArray(AppWidgetManager.EXTRA_APPWIDGET_IDS);
                if (appWidgetIds != null && appWidgetIds.length > 0) {
                    this.onUpdate(context, AppWidgetManager.getInstance(context), appWidgetIds);
                }
            }
        } else if (AppWidgetManager.ACTION_APPWIDGET_DELETED.equals(action)) {
            Bundle extras = intent.getExtras();
            if (extras != null && extras.containsKey(AppWidgetManager.EXTRA_APPWIDGET_ID)) {
                final int appWidgetId = extras.getInt(AppWidgetManager.EXTRA_APPWIDGET_ID);
                this.onDeleted(context, new int[] { appWidgetId });
            }
        } else if (AppWidgetManager.ACTION_APPWIDGET_OPTIONS_CHANGED.equals(action)) {
            Bundle extras = intent.getExtras();
            if (extras != null && extras.containsKey(AppWidgetManager.EXTRA_APPWIDGET_ID)
                    && extras.containsKey(AppWidgetManager.EXTRA_APPWIDGET_OPTIONS)) {
                int appWidgetId = extras.getInt(AppWidgetManager.EXTRA_APPWIDGET_ID);
                Bundle widgetExtras = extras.getBundle(AppWidgetManager.EXTRA_APPWIDGET_OPTIONS);
                this.onAppWidgetOptionsChanged(context, AppWidgetManager.getInstance(context),
                        appWidgetId, widgetExtras);
            }
        } else if (AppWidgetManager.ACTION_APPWIDGET_ENABLED.equals(action)) {
            this.onEnabled(context);
        } else if (AppWidgetManager.ACTION_APPWIDGET_DISABLED.equals(action)) {
            this.onDisabled(context);
        } else if (AppWidgetManager.ACTION_APPWIDGET_RESTORED.equals(action)) {
            Bundle extras = intent.getExtras();
            if (extras != null) {
                int[] oldIds = extras.getIntArray(AppWidgetManager.EXTRA_APPWIDGET_OLD_IDS);
                int[] newIds = extras.getIntArray(AppWidgetManager.EXTRA_APPWIDGET_IDS);
                if (oldIds != null && oldIds.length > 0) {
                    this.onRestored(context, oldIds, newIds);
                    this.onUpdate(context, AppWidgetManager.getInstance(context), newIds);
                }
            }
        }
}PendingIntent
PendingIntent是一种处于等待的状态意图。 PendingIntent是一种在将来的某个不确定的时刻发生,而Intent是立刻发生。
PendingIntent与Intent的区别
- Intent是立刻执行的,而PendingIntent可以等到事件发生后触发,PendingIntent可以cancel。
- Intent在程序结束后即终止,而PendingIntent在程序结束后依然有效。
- PendingIntent自带Context,而Intent需要在某个Context内运行。
- Intent在原task中运行,PendingIntent在新的task中运行。
典型应用场景:给RemoteViews添加单击事件。(闹钟、通知、桌面部件) PendingIntent是对Intent的封装,但它不是立刻执行某个行为,而是满足某些条件或触发某些事件后才执行指定的行为。
获取PendingIntent
//从系统取得一个用于启动一个Activity的PendingIntent对象
public static PendingIntent getActivity(Context context, int requestCode,
            Intent intent, @Flags int flags)

//从系统取得一个用于启动一个Service的PendingIntent对象
public static PendingIntent getService(Context context, int requestCode,
            @NonNull Intent intent, @Flags int flags)

//从系统取得一个用于向BroadcastReceiver的Intent广播的PendingIntent对象
public static PendingIntent getBroadcast(Context context, int requestCode,
@NonNull Intent intent, @Flags int flags)它们的参数都相同,都是四个:Context, requestCode, Intent, flags,分别对应上下文对象、请求码、请求意图用以指明启动类及数据传递、关键标志位。 前面三个参数共同标志一个行为的唯一性,而第四个参数flags:
FLAG_CANCEL_CURRENT:如果当前系统中已经存在一个相同的PendingIntent对象,那么就将先将已有的PendingIntent取消,然后重新生成一个PendingIntent对象。FLAG_NO_CREATE:如果当前系统中不存在相同的PendingIntent对象,系统将不会创建该PendingIntent对象而是直接返回null,如果之前设置过,这次就能获取到。FLAG_ONE_SHOT:该PendingIntent只作用一次。在该PendingIntent对象通过send()方法触发过后,PendingIntent将自动调用cancel()进行销毁,那么如果你再调用send()方法的话,系统将会返回一个SendIntentException。FLAG_UPDATE_CURRENT:如果系统中有一个和你描述的PendingIntent对等的PendingInent,那么系统将使用该PendingIntent对象,但是会使用新的Intent来更新之前PendingIntent中的Intent对象数据,例如更新Intent中的ExtrasFLAG_IMMUTABLE(add API 23):指示创建的挂起意图应不可变的标志。在 Android 12 (API 31)之前的系统中,不带有该标记创建的 PendingIntent 默认是可变类型。FLAG_MUTABLE(add API 31):指示创建的挂起意图应该是可变的标志
PendingIntent的匹配规则:两个PendingIntent内部的Intent和requestCode相同,即匹配成功。 Intent的匹配规则:两个Intent的ComponentName和intent-filter都相同,匹配成功。 关于 PendingIntent 您需要知道的那些事
RemoteViews的内部机制
常用的构造方法:前者是当前应用的包名,通过getPackageName获取;后者是待加载的布局文件。
public RemoteViews(String packageName, int layoutId) {
        this(getApplicationInfo(packageName, UserHandle.myUserId()), layoutId);
}但是RemoteViews并不支持所有的View:
INFO
RemoteViews 对象(因而应用微件)可以支持以下布局类:
以及以下微件类:
- AnalogClock
- Button
- Chronometer
- ImageButton
- ImageView
- ProgressBar
- TextView
- ViewFlipper
- ListView
- GridView
- StackView
- AdapterViewFlipper
但是不支持这些类的后代以及自定义View。
通过反射更新View元素

RemoteViews的内部机制
布局文件实际上在Service中被加载。 疑问 系统对加载的View的一系列界面更新任务会通过set提交。但是set方法并不是立刻执行,而是等到RemoteViews被加载以后才执行。具体的更新操作是在SystemServer中执行。  之所以不通过Binder直接跨进程去更新View和操作View,是因为View的方法多,代价太大;其次频繁的更新View势必产生大量的IPC操作,影响效率。 因此使用RemoteViews中的一个Action的概念。一个Action就代表一个View操作,它实现了Parcelable接口可以跨进程传输,系统将这些Action传输道远程进程中,在远程进程中去执行这些Action NotificationManager和 AppWidgetManager提交界面更新,也就是一组Action,而在NotificationService和NotificationService中通过RemoteViews的apply方法,实则调用到Action的apply方法,由他执行真正的界面更新操作。 如此的好处是,
- 不需要定义大量的Binder接口
- 对于远程进程中的界面操作是批量进行的(每次执行一组Action),提高了效率和性能

private Action getActionFromParcel(Parcel parcel, int depth) {
        int tag = parcel.readInt();
        switch (tag) {
            ......
        }
};源码分析RemoteViews的工作流程
通过setTextViewText方法来分析它的工作流程 通过set的方法添加Action viewId标识具体的View,就是被操作的View的id。text是要set的内容
public void setTextViewText(@IdRes int viewId, CharSequence text) {
        setCharSequence(viewId, "setText", text);
}setCharSequence中添加了一个反射对象ReflectionAction
public void setCharSequence(@IdRes int viewId, String methodName, CharSequence value) {
        addAction(new ReflectionAction(viewId, methodName, BaseReflectionAction.CHAR_SEQUENCE,
                value));
}addAction中证实每调用一次set,就会创建一个Action对象并把它保存在ArrayList中
private void addAction(Action a) {
        if (hasMultipleLayouts()) {
            throw new RuntimeException("RemoteViews specifying separate layouts for orientation"
                    + " or size cannot be modified. Instead, fully configure each layouts"
                    + " individually before constructing the combined layout.");
        }
        if (mActions == null) {
            mActions = new ArrayList<>();
        }
        mActions.add(a);
}RemoteViews的apply加载布局和调用更新界面,result是一个View
public View apply(Context context, ViewGroup parent, InteractionHandler handler,
            @Nullable SizeF size, @Nullable ColorResources colorResources) {
        RemoteViews rvToApply = getRemoteViewsToApply(context, size);

        View result = inflateView(context, rvToApply, parent, 0, colorResources);
        rvToApply.performApply(result, parent, handler, colorResources);
        return result;
}private RemoteViews getRemoteViewsToApply(Context context) {
if (hasLandscapeAndPortraitLayouts()) {
int orientation = context.getResources().getConfiguration().orientation;
if (orientation == Configuration.ORIENTATION_LANDSCAPE) {
return mLandscape;
}
return mPortrait;
}
if (hasSizedRemoteViews()) {
return findSmallestRemoteView();
}
return this;
}performApply 遍历Action列表执行每一个Action的apply操作
private void performApply(View v, ViewGroup parent, InteractionHandler handler,
            ColorResources colorResources) {
        if (mActions != null) {
            handler = handler == null ? DEFAULT_INTERACTION_HANDLER : handler;
            final int count = mActions.size();
            for (int i = 0; i < count; i++) {
                Action a = mActions.get(i);
                a.apply(v, parent, handler, colorResources);
            }
        }
}reapply更新界面
 private void reapply(Context context, View v, InteractionHandler handler, SizeF size,
            ColorResources colorResources, boolean topLevel) {

        RemoteViews rvToApply = getRemoteViewsToReapply(context, v, size);

        rvToApply.performApply(v, (ViewGroup) v.getParent(), handler, colorResources);

        // If the parent of the view is has is a root, resolve the recycling.
        if (topLevel && v instanceof ViewGroup) {
            finalizeViewRecycling((ViewGroup) v);
        }
}AppWidgetHostView
调用reapply更新界面
rvToApply.reapply(mContext, mView, mInteractionHandler, mCurrentSize,
mColorResources);protected void applyRemoteViews(@Nullable RemoteViews remoteViews, boolean useAsyncIfPossible) {
boolean recycled = false;
View content = null;
Exception exception = null;
// Block state restore until the end of the apply.
mLastInflatedRemoteViewsId = -1;
if (mLastExecutionSignal != null) {
mLastExecutionSignal.cancel();
mLastExecutionSignal = null;
}
if (remoteViews == null) {
if (mViewMode == VIEW_MODE_DEFAULT) {
// We've already done this -- nothing to do.
return;
}
content = getDefaultView();
mViewMode = VIEW_MODE_DEFAULT;
} else {
// Select the remote view we are actually going to apply.
RemoteViews rvToApply = remoteViews.getRemoteViewsToApply(mContext, mCurrentSize);
if (mOnLightBackground) {
rvToApply = rvToApply.getDarkTextViews();
}
if (mAsyncExecutor != null && useAsyncIfPossible) {
inflateAsync(rvToApply);
return;
}
// Prepare a local reference to the remote Context so we're ready to
// inflate any requested LayoutParams.
mRemoteContext = getRemoteContextEnsuringCorrectCachedApkPath();
if (!mColorMappingChanged && rvToApply.canRecycleView(mView)) {
try {
rvToApply.reapply(mContext, mView, mInteractionHandler, mCurrentSize,
mColorResources);
content = mView;
mLastInflatedRemoteViewsId = rvToApply.computeUniqueId(remoteViews);
recycled = true;
if (LOGD) Log.d(TAG, "was able to recycle existing layout");
} catch (RuntimeException e) {
exception = e;
}
}
// Try normal RemoteView inflation
if (content == null) {
try {
content = rvToApply.apply(mContext, this, mInteractionHandler,
mCurrentSize, mColorResources);
mLastInflatedRemoteViewsId = rvToApply.computeUniqueId(remoteViews);
if (LOGD) Log.d(TAG, "had to inflate new layout");
} catch (RuntimeException e) {
exception = e;
}
}
mViewMode = VIEW_MODE_CONTENT;
}
applyContent(content, recycled, exception);
}RemoteViews的意义
MainActivity充当通知栏,而BaseActivity充当发送通知。让两个Activity运行在不同的进程,构成跨进程的场景,BaseActivity中通过广播的方式不断向MainActivity发送Action,更新MainActivity的界面。 通过指定process属性更改进程。
<activity
            android:name=".MainActivity"
            android:process=":remote"
            android:exported="true">
            <intent-filter>
                <action android:name="android.intent.action.MAIN" />

                <category android:name="android.intent.category.LAUNCHER" />
            </intent-filter>

            <meta-data
                android:name="android.app.lib_name"
                android:value="" />
</activity>BaseActivity中:
remoteViews.setTextViewText(R.id.msg, "msg from process:"+Process.myPid()+"");
MainActivity中:
remoteViews.reapply(getApplicationContext(), view);
这里报了一个奇怪的错,虽然解决了不过不知所以然。
java.lang.RuntimeException: Error receiving broadcast Intent { act=com.hnucm.chapter5_2.action_REMOTE flg=0x10 (has extras) } in com.hnucm.chapter5_2.MainActivity$1@bafd4d2
    at android.app.LoadedApk$ReceiverDispatcher$Args.lambda$getRunnable$0$LoadedApk$ReceiverDispatcher$Args(LoadedApk.java:1689)
    at android.app.LoadedApk$ReceiverDispatcher$Args$$ExternalSyntheticLambda0.run(Unknown Source:2)
    at android.os.Handler.handleCallback(Handler.java:938)
    at android.os.Handler.dispatchMessage(Handler.java:99)
    at android.os.Looper.loopOnce(Looper.java:201)
    at android.os.Looper.loop(Looper.java:288)
    at android.app.ActivityThread.main(ActivityThread.java:7842)
    at java.lang.reflect.Method.invoke(Native Method)
    at com.android.internal.os.RuntimeInit$MethodAndArgsCaller.run(RuntimeInit.java:548)
    at com.android.internal.os.ZygoteInit.main(ZygoteInit.java:1003)
    Caused by: android.widget.RemoteViews$ActionException: android.widget.RemoteViews$ActionException: view: androidx.appcompat.widget.AppCompatImageView can't use method with RemoteViews: setImageResource(int)
    at android.widget.RemoteViews$BaseReflectionAction.apply(RemoteViews.java:1731)
    at android.widget.RemoteViews.performApply(RemoteViews.java:5908)
    at android.widget.RemoteViews.reapply(RemoteViews.java:5858)
    at android.widget.RemoteViews.reapply(RemoteViews.java:5799)
    at android.widget.RemoteViews.reapply(RemoteViews.java:5793)
    at android.widget.RemoteViews.reapply(RemoteViews.java:5788)
    at com.hnucm.chapter5_2.MainActivity.updateUI(MainActivity.java:60)
    at com.hnucm.chapter5_2.MainActivity.access$000(MainActivity.java:22)
    at com.hnucm.chapter5_2.MainActivity$1.onReceive(MainActivity.java:35)
    at android.app.LoadedApk$ReceiverDispatcher$Args.lambda$getRunnable$0$LoadedApk$ReceiverDispatcher$Args(LoadedApk.java:1679)
    at android.app.LoadedApk$ReceiverDispatcher$Args$$ExternalSyntheticLambda0.run(Unknown Source:2)
    at android.os.Handler.handleCallback(Handler.java:938)
    at android.os.Handler.dispatchMessage(Handler.java:99)
    at android.os.Looper.loopOnce(Looper.java:201)
    at android.os.Looper.loop(Looper.java:288)
    at android.app.ActivityThread.main(ActivityThread.java:7842)
    at java.lang.reflect.Method.invoke(Native Method)
    at com.android.internal.os.RuntimeInit$MethodAndArgsCaller.run(RuntimeInit.java:548)
    at com.android.internal.os.ZygoteInit.main(ZygoteInit.java:1003)
    Caused by: android.widget.RemoteViews$ActionException: view: androidx.appcompat.widget.AppCompatImageView can't use method with RemoteViews: setImageResource(int)
    at android.widget.RemoteViews.getMethod(RemoteViews.java:1354)
    at android.widget.RemoteViews.access$1000(RemoteViews.java:169)
    at android.widget.RemoteViews$BaseReflectionAction.apply(RemoteViews.java:1729)
    at android.widget.RemoteViews.performApply(RemoteViews.java:5908)
    at android.widget.RemoteViews.reapply(RemoteViews.java:5858)
    at android.widget.RemoteViews.reapply(RemoteViews.java:5799)
    at android.widget.RemoteViews.reapply(RemoteViews.java:5793)
    at android.widget.RemoteViews.reapply(RemoteViews.java:5788)
    at com.hnucm.chapter5_2.MainActivity.updateUI(MainActivity.java:60)
    at com.hnucm.chapter5_2.MainActivity.access$000(MainActivity.java:22)
    at com.hnucm.chapter5_2.MainActivity$1.onReceive(MainActivity.java:35)
    at android.app.LoadedApk$ReceiverDispatcher$Args.lambda$getRunnable$0$LoadedApk$ReceiverDispatcher$Args(LoadedApk.java:1679)
    at android.app.LoadedApk$ReceiverDispatcher$Args$$ExternalSyntheticLambda0.run(Unknown Source:2)
    at android.os.Handler.handleCallback(Handler.java:938)
    at android.os.Handler.dispatchMessage(Handler.java:99)
    at android.os.Looper.loopOnce(Looper.java:201)
    at android.os.Looper.loop(Looper.java:288)
    at android.app.ActivityThread.main(ActivityThread.java:7842)
    at java.lang.reflect.Method.invoke(Native Method)
    at com.android.internal.os.RuntimeInit$MethodAndArgsCaller.run(RuntimeInit.java:548)
at com.android.internal.os.ZygoteInit.main(ZygoteInit.java:1003)将remoteViews.reapply(this, view);替换成remoteViews.reapply(getApplicationContext(), view);
int layoutId = getResources().getIdentifier("layout_notification", "layout", getPackageName());
        View view = getLayoutInflater().inflate(layoutId, mRemoteViewsContent, false);
        remoteViews.reapply(getApplicationContext(), view);
mRemoteViewsContent.addView(view);getApplicationContext 详解_qxs`的博客-CSDN博客_getapplicationcontext